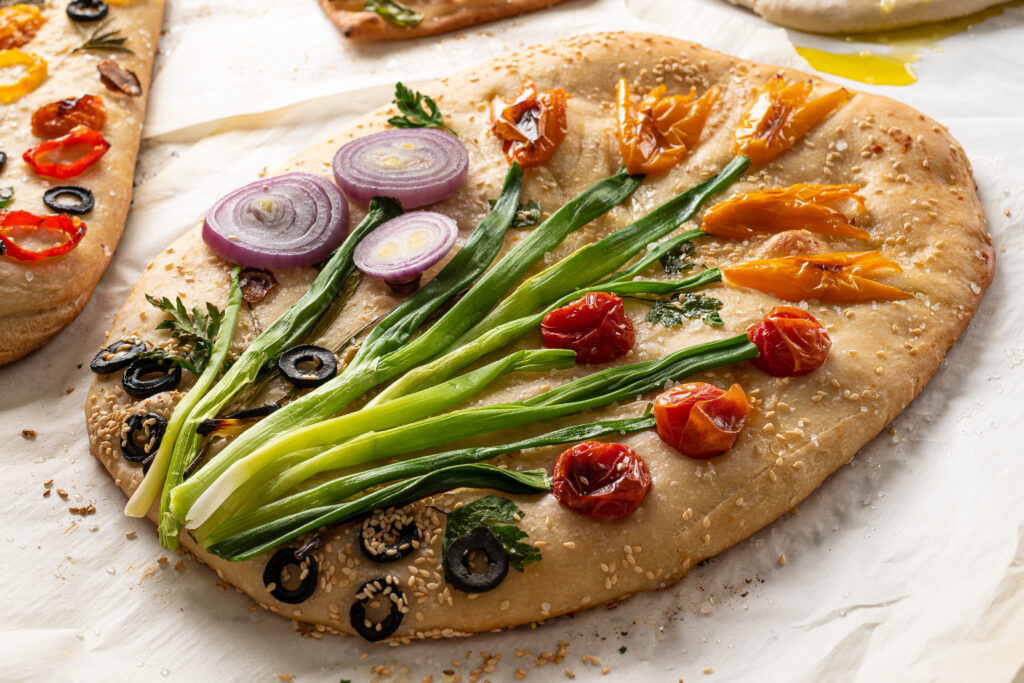
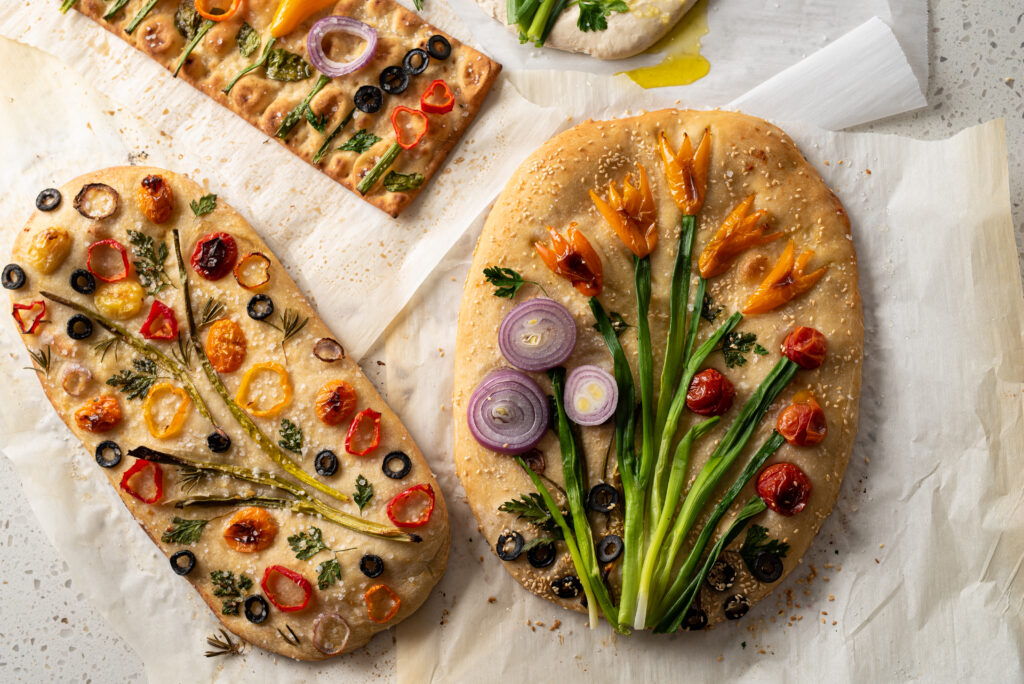
Flower focaccia is one of the prettiest ways to turn homemade bread into edible art. Soft focaccia dough becomes a blank canvas for colorful vegetables, herbs, and olives arranged into blooming flowers and garden scenes. It’s fun to create, delicious to eat, and perfect for holidays, entertaining, or baking with kids.
Our version keeps it simple and creative with frozen pizza dough and fresh toppings, making it approachable for beginner bakers while still looking stunning.
What Is Flower Focaccia?
Flower focaccia, also called garden focaccia or focaccia bread art, is an artistic version of classic Italian focaccia bread decorated with vegetables and herbs to resemble flowers and gardens.
The trend became incredibly popular because focaccia dough acts like a “blank canvas” for creativity. Every loaf becomes a unique edible masterpiece.
The best part? There’s no wrong way to decorate it.
Why Flower Focaccia Is Perfect for Group Activities
One of the reasons flower focaccia has become so popular is because it’s the perfect hands-on group activity. Synagogues, schools, camps, organizations, and women’s events love using flower focaccia workshops as a creative and relaxing experience that everyone can enjoy together.
Each person gets to decorate their own focaccia with colorful vegetables and herbs, making every loaf unique. It’s interactive, beginner-friendly, and creates a beautiful finished result that people are excited to take home and share.
Flower focaccia activities are especially popular for:
- Shul events
- Sisterhood gatherings
- Team-building workshops
- Holiday programs
- Bat mitzvah activities
- Community get-togethers
- Cooking nights with friends
It combines creativity, food styling, and baking into one memorable activity that works for all ages and skill levels.
Tips for the Best Flower Focaccia
Use Colorful Vegetables
Bright vegetables create the prettiest designs. Bell peppers, cherry tomatoes, and herbs make the focaccia look like a real garden.
Brush Vegetables with Olive Oil
A light coating of olive oil helps keep herbs and veggies from burning during baking.
Don’t Overcrowd the Dough
Leave some space between decorations so the bread can rise properly.
Make It Family-Friendly
Flower focaccia is a fun activity for kids and guests. Everyone can decorate their own section of bread.
When to Serve Flower Focaccia
Flower focaccia is perfect for:
- Shavuos
- Spring brunches
- Mother’s Day
- Holiday entertaining
- Cheese boards
- Soup nights
- Group baking events
- Community workshops
- Baking projects with kids
It also makes a stunning centerpiece for a festive table.
Why Everyone Loves Flower Focaccia
Flower focaccia combines creativity with comfort food. The crispy golden crust, fluffy interior, olive oil flavor, and colorful vegetables make it both beautiful and delicious.
Whether you make simple flowers or elaborate garden scenes, every loaf becomes uniquely yours.