Original Tablescapes, Crafts & Jewish Holiday Hosting

More results...

Generic selectors
Exact matches only
Search in title
Search in content
Post Type Selectors
post

Eye candy to devour!

Because Creativity

is Contagious!

Chocolate Feathers

Chocolate Feathers

EstherO Entertainment Picks

SLUSHIE MACHINE
CAMP & PARTY GAMES
ZIP BALL

Turn Any Dessert into a Showstopper with These Easy Chocolate Feathers

Looking to elevate your desserts without spending hours in the kitchen?
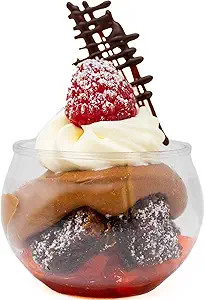
This simple chocolate feather is not only easy and fun to make, but it instantly transforms even the most basic dessert into an elegant work of art. Serve it in a mousse cup, alongside a scoop of ice cream, use it to top a frosted cake, or lay it across a plated dessert for a professional touch.

We love the chocolate mousse recipe from Something Sweet.

A feather is a nice idea to stick into a Rosh Hashanah dessert because on Rosh Hashanah, we daven to be inscribed in the Sefer HaChaim — the Book of Life. What better symbol than a feather, reminiscent of the quill used to write our names B’ Sefer HaChaim ?”

This chocolate feather is the kind of DIY that delivers big results with minimal effort. It’s a fun project for kids or an easy way to add a touch of elegance to your Yom Tov table (or any celebration!).


What You’ll Need

  • A couple of pieces of chocolate (dark, milk, or white — your choice)

  • gallon-size Ziploc freezer bag

  • parchment paper

  • fork

Shop this Post

Parchment Paper »
Mousse Cups »
Something Sweet »

Step-by-Step Directions

1. Melt the Chocolate

Break your chocolate into small pieces and gently melt it. You can do this in short bursts in the microwave or using a double boiler. Once smooth, pour it into a gallon-size Ziploc freezer bag. 

2. Prep Your Surface

Lay a sheet of parchment paper flat on your work surface or over a baking tray (which makes it easier to move to the fridge later).

3. Snip the Corner of the ziploc

Use scissors to snip a tiny hole in one corner of the bag. Start small — you can always widen it if needed.

4. Draw Your Feather

Squeeze out a thick line of chocolate onto the parchment. This will be the center of your feather.

5. Create the Feather Effect

Take a fork and gently drag the chocolate out from the center line to both sides. This creates the “feathery” effect. Repeat on both sides, working your way down the chocolate line.

6. Add Definition

Want it to look even more realistic? Once your feather shape is done, pipe a thinner line of chocolate over the center again to clean up the look.

7. Let It Set

Allow the chocolate feather to harden completely. You can leave it at room temperature or pop it into the fridge for a quicker set.

Let us know if you try it — we’d love to see how you use your chocolate feathers!


Photography by Sina Mizrahi

This article originally appeared in Family First


You can find more inspo at: ,

FOR MORE CREATIVE TABLESCAPES, FOOD, CRAFTS, GREAT LINKS AND DEALS MAKE SURE TO JOIN OUR WHATSAPP STATUS.


WANT UPDATES AND FRESH CONTENT? JOIN OUR WHATSAPP GROUP AND STAY IN THE LOOP.

EstherO is an Amazon Affiliates Associate and may make a small commission from any purchases made through the links on its website, at no additional cost to you

Please double-check all kosher certification as there are constant changes.

Leave a Reply

Your email address will not be published. Required fields are marked *


Related Posts

Signup for Bonuses!

Free End of Year

Thank You Cards Printables

Skip to content